You must know how to test and maintain waterproof outdoor cabinets for year-round protection. First, test your outdoor cabinets to find hidden damage. Next, inspect your outdoor setup for signs of wear.
Note: This proactive maintenance prevents costly damage. A seasonal maintenance checklist is your guide for year-round protection. This seasonal plan helps you keep your outdoor investment safe.
How to Test and Maintain Waterproof Outdoor Cabinets for Year-Round Protection

You need to know how to test and maintain waterproof outdoor cabinets for year-round protection. Regular testing reveals hidden weaknesses before they cause serious damage. This guide shows you two effective methods to check your outdoor cabinet’s integrity. Proper maintenance starts with good testing.
The Standardized Hose Test
The hose test is a simple, direct way to check for leaks. It mimics heavy rain and helps you find weak spots in your seals. Before you begin, it helps to understand industry standards for water protection. Manufacturers use ratings like NEMA (National Electrical Manufacturers Association) and IP (Ingress Protection) to define how well an enclosure resists water. The IP rating system is especially useful. Its second digit tells you the specific level of water resistance.
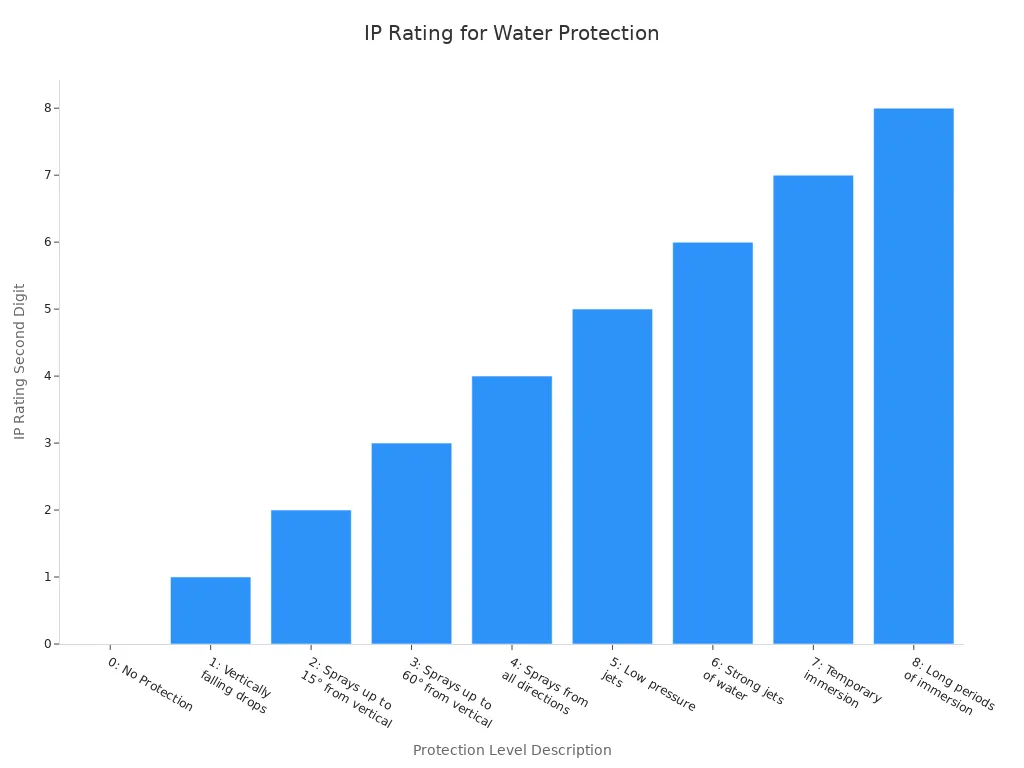
Most high-quality outdoor cabinets aim for a rating of IP65 or IP66. This ensures they can handle strong jets of water from any direction. The following table shows how NEMA ratings compare to IP ratings for water protection.
| NEMA rating | Description (Water Protection) | IP rating (Water Protection) |
|---|---|---|
| 3 & 3S | Outdoor use with protection from windblown dust, rain & sleet. | IP55 (Low pressure jets of water) |
| 4 & 4X | Indoors or outdoors use with protection from wash-down environment. | IP66 (Water from seas or high-pressure jets) |
| 6 & 6P | Indoor & outdoor use. Protection against hose-directed water & temporary submersion. | IP67 (Effects of immersion in water for 30 minutes) |
Now, you can perform your own test. Follow these steps to safely check your outdoor setup.
- Prepare the Cabinet: Empty the cabinet completely. Place a flashlight or a bright, battery-powered light inside.
- Set Up Your Hose: Use a standard garden hose with a spray nozzle. For a test that mimics severe weather, aim for a water pressure of 30-35 psi.
- Conduct the Test: Stand about one foot away from the cabinet. Spray water systematically over all seams, joints, and door edges. Focus on one area for at least 30 seconds before moving to the next.
- Inspect for Leaks: After spraying, turn off the water. Open the cabinet doors. Look for any signs of moisture, drips, or water beads inside. The light you placed inside will help you spot any wetness. Any water ingress indicates a seal failure that needs immediate attention to prevent future damage.
Pro Tip: Perform this test on a clear, dry day. This makes it easier to spot leaks without confusing them with recent rainfall. This is a key part of how to test and maintain waterproof outdoor cabinets for year-round protection.
The Pressurized Air Test
A pressurized air test is a more advanced method. It can detect very small leaks that a hose test might miss. This test is ideal for high-value outdoor cabinets or those protecting sensitive equipment. It works by slightly pressurizing the inside of the cabinet and checking for escaping air.
You will need specific equipment for this test.
- Purge Control Unit (PCU): This device measures and controls air pressure and flow safely.
- Air Compressor: A small, low-pressure compressor is sufficient.
- Smoke Source: A fog machine or smoke bomb helps you see where air is escaping.
Be very careful with air pressure. Even small pressure changes can cause damage. A pressure of just 1 PSI can deform some materials. For testing, a very low pressure is safest.
Safety First: Industry tests show that a peak pressure of just 0.07 PSI is effective for finding leaks without risking damage to the cabinet structure. Never exceed 1 PSI during your test.
Here is a simple process for a safe air test.
- Seal the Cabinet: Ensure the cabinet is closed and latched securely. If there are any cable ports, seal them temporarily.
- Introduce Air and Smoke: Use the PCU to slowly introduce a small amount of air and smoke into the cabinet. Keep the pressure at or below 0.07 PSI.
- Observe for Leaks: Carefully watch all seams, gaskets, and hardware. Escaping smoke will pinpoint the exact location of any leak.
This maintenance check gives you a precise understanding of your cabinet’s condition. Knowing how to test and maintain waterproof outdoor cabinets for year-round protection against all types of weather is crucial for long-term durability. This method helps you find and fix problems before the next storm. Your outdoor investment deserves this level of care.
A Data-Backed Inspection Checklist for Your Cabinets
After testing, you need a detailed inspection. This data-backed checklist helps you spot wear and tear before it causes major damage. Regular inspection is a key part of your outdoor maintenance plan.
Seal and Gasket Inspection
Your cabinet’s seals and gaskets are its first line of defense against moisture. You should inspect them closely for signs of failure. A worn-out seal can let in moisture and contaminants, leading to serious problems. Look for these warning signs:
- Visible cracks or brittleness on the gasket surface.
- Seals that appear compressed, worn, or damaged.
- Any sign of moisture or corrosion inside the cabinets.
Different materials have different lifespans. Knowing your gasket material helps you predict its longevity. Field tests show silicone gaskets maintain about 90% of their seal strength after five years of outdoor exposure. This table shows the typical lifespan for common outdoor gasket materials.
| Gasket Material | Typical Lifespan |
|---|---|
| Silicone | 10–20 years |
| EPDM | 8–15 years |
| Nitrile (NBR) | 5–10 years |
| Neoprene | 5–10 years |
| Natural Rubber | 2–5 years |
Material Integrity Check
The sun’s UV rays are a primary cause of damage to outdoor furniture and enclosures. Over time, this exposure can cause discoloration, brittleness, and loss of strength. You must check your cabinet’s main body for this kind of weather-related wear. Look for fading, chalking, or small cracks on the surface.
Choosing the right weather-resistant materials is crucial for long-term durability. Materials like high-density polyethylene (HDPE) and polycarbonate (PC) offer excellent UV resistance. They are designed to withstand harsh outdoor weather and prevent premature aging. This ensures your investment is protected from sun damage.
Hardware and Fastener Audit
Your inspection should include all hardware. Check hinges, latches, locks, and fasteners. Rust and corrosion are clear indicators of a failing waterproof seal. You should look for any signs of rust, especially around screws and joints. Test every moving part. Ensure latches close tightly and hinges move smoothly. Loose or corroded hardware can compromise the door seal, creating a weak point for water to enter during severe weather.
Essential Repair and Reinforcement Techniques
After your inspection, you can begin repairs. These essential repair and reinforcement techniques are your best structural preservation strategies. They help you fix issues before they cause serious damage and extend the longevity of your outdoor setup.
Replacing Degraded Seals
You should replace a gasket as soon as you notice it is cracked or brittle. A new seal restores the primary waterproof barrier. First, carefully remove the old gasket. Clean the channel thoroughly to remove any old adhesive or debris. Then, press the new gasket firmly into place. This simple action is crucial for the long-term durability of your outdoor cabinets.
Applying Waterproof Sealants
You can reinforce your cabinet’s defenses by applying a high-quality waterproof sealant. Use an exterior-grade silicone or polyurethane sealant along all seams, joints, and fastener entry points. This creates an extra barrier against harsh weather.
Pro Tip: For a clean application, use painter’s tape to create a straight line on either side of the seam. Apply the sealant, smooth the bead with a tool, and remove the tape before the sealant skins over.
Repairing Rust and Corrosion
Rust on your hardware is a clear sign of moisture damage. You must address it quickly to prevent further decay. For stainless steel hardware, you can use a commercial rust remover.
- Products containing oxalic acid, like Bar Keepers Friend, are very effective.
- Use the powdered formula for heavy rust on tools or fasteners.
- Choose the less abrasive liquid formula for cleaning larger stainless steel surfaces to avoid scratches.
After removing the rust, your next maintenance step is prevention. Protecting your outdoor hardware from future rust is key. An anti-rust spray like WD-40 Specialist Corrosion Inhibitor offers long-lasting protection against moisture and bad weather. Applying it to hinges and locks helps prevent costly damage by creating a non-drying barrier that can last up to a year outdoors. This protects your metal parts from the elements.
Your Seasonal Maintenance Schedule for 2026

A consistent seasonal maintenance plan provides the best protection for your outdoor setup. This schedule breaks down essential tasks by season. Following this guide helps you prevent damage and extend the life of your investment. This proactive approach is key to year-round seasonal protection.
Spring Maintenance: Post-Winter Recovery
Spring is the time to assess your outdoor space after the harsh winter weather. Your first step is a thorough cleaning and inspection. This seasonal recovery sets you up for a successful year.
- Clean All Surfaces: Wash your outdoor cabinets with mild soap and water. This removes winter grime, pollen, and dust. A good rinse renews the finish.
- Inspect for Damage: Look closely for any winter damage. Check for cracks, warping, or corrosion that may have occurred. Address any issues you find right away.
- Test Functionality: Test all your outdoor kitchen components. Make sure grills, refrigerators, and sinks operate correctly. This is a great time to handle any needed repairs.
- Refresh Your Space: Consider replacing worn-out accessories. New cushions or curtains can give your outdoor area a fresh look for the new season.
Summer Maintenance: UV Protection Focus
Summer brings heat and humidity. These elements can affect your cabinet materials. Your summer maintenance should focus on managing these environmental stressors.
High humidity causes wood to expand. This natural movement can create pressure on joints and seams. You might see small lines or cracks appear, especially on painted surfaces. This is a normal response to changes in moisture.
Did You Know? Wood can grow about 1% for every 4% change in relative humidity. This movement is powerful. It can cause joint failure or warped panels over time. Engineered wood products often show more stability and are less likely to move or crack under summer heat.
Your main task is to monitor your outdoor cabinets for signs of stress. Ensure seals remain tight. Check that doors and drawers continue to close properly. Proper ventilation around your outdoor area can help manage humidity levels.
Fall Maintenance: Pre-Winter Preparation
Fall is your chance to prepare your outdoor cabinets for cold weather. Your goal is to winterize the setup to prevent moisture damage from ice and snow. This preparation is the most important part of your annual maintenance.
Create a final checklist before winter to guide your work.
- Deep Clean and Protect: Clean all stainless steel surfaces thoroughly. Apply a coat of stainless steel polish before covering. This adds a layer of defense against moisture.
- Empty Everything: Remove all items from inside your cabinets. This prevents items from freezing and causing damage. It also stops them from trapping moisture.
- Manage Water Lines: Turn off the water supply to your outdoor sink. Remove the P-trap from under the sink. This action prevents water from collecting, freezing, and cracking the pipes.
- Cover Securely: Cover your entire outdoor kitchen setup. Use a high-quality, breathable cover. A breathable fabric is crucial because it stops moisture from getting trapped underneath, which can cause rust, mold, or other damage. A good cover protects your investment from the worst winter weather.
Winter Check-In: Quick Inspection and Protection
Your fall efforts to winterize your outdoor setup provide a strong defense. However, harsh winter weather demands a quick mid-season check. This brief maintenance ensures your protection holds strong against snow and ice. A quick look now can prevent serious damage later. This seasonal check is a vital part of your overall outdoor cabinet care.
Important Note: Perform this check during a break in the weather. A clear, dry day is ideal. You want to avoid introducing more moisture into your outdoor space.
Your main goal is to spot issues caused by persistent cold and moisture. This quick inspection keeps your outdoor investment safe. Follow these steps for your winter maintenance check.
- Clear Debris: Gently brush away any accumulated snow, ice, or wet leaves from cabinet tops and around the base. This weight can stress hinges and seals. Trapped debris holds moisture, which can cause damage over time.
- Inspect Your Covers: Ensure your outdoor cabinet covers are still secure and have not torn. Strong winds can loosen them. A compromised cover exposes your cabinets to the worst of the winter weather.
- Perform a Visual Check: Briefly open the cabinet doors. Look for any signs of trouble inside. You should specifically check for:
- Warping or mold on seals, hinges, and drawers.
- Hidden spots where leaves or moisture may have gathered.
- Any signs of water ingress that could lead to ice damage.
This simple seasonal maintenance routine helps you catch problems early. It confirms your fall preparations are working and provides peace of mind. Consistent care is the best way to protect your outdoor cabinets from severe weather and prevent costly damage.
Advanced Tips for Outdoor Kitchen Maintenance
Advanced outdoor kitchen maintenance goes beyond basic checks. You can protect your investment with smart cleaning, lubrication, and documentation. These steps ensure your outdoor space withstands harsh weather and avoids preventable damage. Proper outdoor kitchen care involves a detailed, year-round strategy.
Cleaning and Grime Removal
Routine cleaning is fundamental to your cleaning and maintenance plan. It prevents grime buildup on your outdoor setup. For powder-coated metal surfaces, you should use gentle methods.
- Mix mild soap with warm water. Use a soft cloth to gently break down stains.
- For stubborn grime, you can create a paste with baking soda and water. Apply it, scrub lightly, and rinse well.
This routine cleaning protects the finish and prevents long-term damage. After cleaning, you can apply a non-abrasive car wax with UV blockers for extra protection. This is a key part of dealing with countertops and cabinets.
Lubricating Moving Parts
Your outdoor cabinet hinges and latches face constant exposure. Lubricating these moving parts is a quick but vital maintenance task. It ensures smooth operation and a tight seal. A good seal is your best defense against moisture from bad weather. Use a silicone-based or marine-grade lubricant. Apply it to all hinges, locks, and drawer slides. This simple action prevents rust and wear, extending the life of your hardware.
Documenting Your Maintenance
You should document your outdoor kitchen maintenance activities. A detailed log helps you track material performance and anticipate future repairs. This record is invaluable for seasonal tasks like draining water lines or remembering to winterize your setup. You can use digital apps like HomeZada or Sortly to manage your records. These tools offer features for your outdoor kitchen maintenance.
Smart Tracking Features:
- Automated reminders for seasonal tasks.
- Photo documentation to record repairs.
- Warranty management with expiration alerts.
Your log should track key details. Note any error codes from appliances, configuration settings, and the dates you perform tasks like protecting refrigeration units or cleaning and covering surfaces. This data-driven approach to maintenance makes choosing the right covers and planning repairs much easier.
You now know how to test and maintain waterproof outdoor cabinets for year-round protection. Your outdoor setup’s durability depends on three pillars: consistent testing, diligent inspection, and scheduled maintenance. This proactive maintenance prevents serious damage.
You can ensure the longevity of your outdoor investment. Logging your activities helps you anticipate repairs and stop weather damage before it starts. This gives your outdoor cabinets lasting protection.
FAQ
How often should I test my outdoor cabinets?
You should perform a water test at least once a year. It is also smart to test them after any severe weather event. This proactive check helps you find and fix leaks early, preventing serious water damage to your outdoor setup.
What is the best material for outdoor cabinet seals?
Silicone gaskets offer the best performance for outdoor use. Data shows they have excellent resistance to weather and can last up to 20 years. This makes silicone a durable choice for protecting your investment from moisture and preventing costly damage.
Can I repair a small tear in a gasket?
You should avoid temporary repairs for torn gaskets. A patch cannot guarantee a waterproof seal. The best solution is to replace the entire gasket. This action fully restores your cabinet’s protection against water and prevents future leaks.
Why is a breathable cover important for winter?
A breathable cover lets moisture escape. Non-breathable materials trap condensation against your cabinets. This trapped moisture can cause rust, mold, and material warping. Using the right cover is a key step to prevent winter weather damage.